Howto: flash a Gotek with no programmer
I wanted to mod my Gotek running the Cortex firmware to support a display, and the OLED 128×32 displays seem neat, and cheap, and well supported. Whilst doing that, I thought I might as well move to open firmware, and wanted to try FlashFloppy from KeirF. On his instructions page there’s a howto for flashing using a programmer, and a link to a video noting that due to the bootloader in the ST micro platform you don’t need a programmer.
For those that prefer instructions, here’s some!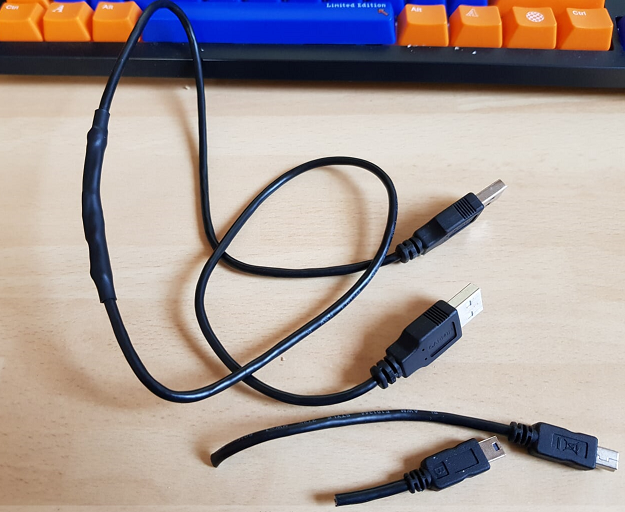
You will need:
- A Gotek drive
- A USB A to USB A cable (make one if you don’t have one to hand)
- Software from ST Microelectronics
- 2 jumper leads or appropriate way to connect pins on the Gotek.
The USB A to A cable is not a common cable: it is literally every pin connected from a USB A plug to another USB A plug. I didn’t have one, but I have accumulated hundreds* of USB A to mini B through the years. Two gave their lives to become one.
Jumper the GoTek into bootloader mode, and USB mode:
Standard (Nick's numbering!)
1 2 3 4 5
. . . . .     . . . . . . .
    . . .     . . . . . . .
    8 7 6

PowerCon
 | | | |
 | | | |
You need to connect pin 1 to 2, and 3 to 7 (across the diagonal, yes, and a standard jumper won’t reach).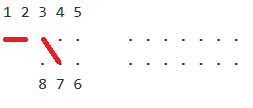
Download and install PC Software
Download the software from ST Microelectronics. You will need to provide an email address and you will be emailed a link. Install the software.
Plug in and check DFU
You do not need power, or anything else connected other than your USB A to USB A cable. Plug the Gotek into a USB port on your PC using the A-A cable. You will hear a few connects/disconnects as the PC tries to work out what’s going on, and you’ll have a USB device in Device Manager called “STM Device in DFU Mode”. I didn’t have to update drivers, but if you are getting “unrecognised device” then click on the unrecognised device in Device Manager and update driver to the one located in /program files(x86)/STMicroelectronics/Software/DFusev3.05/Bin/Driver
Create DFU from HEX
Take 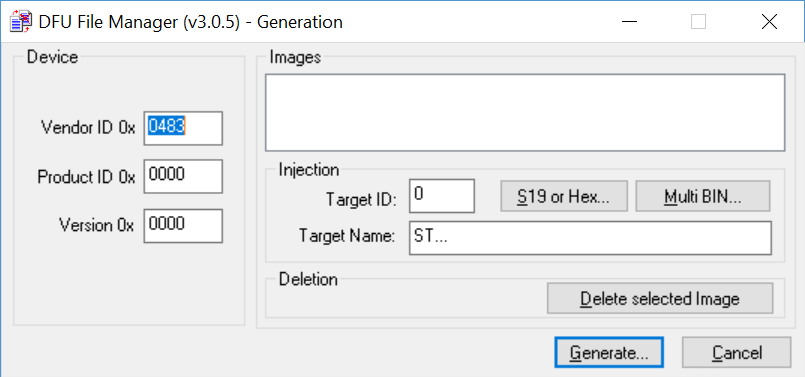 the FlashFloppy .hex file from the distribution, and run DFU File Manager (from the Start Menu). You do not need to change any of the defaults, just click “S19 or Hex”, seelct your hex file and click OK to load it, then select the “Image” in the listbox. Finally, click “Generate” and select a save location for your DFU file.
Upgrade the Firmware
Open DFuseDemo from the Start menu. You will see “ST Electronics device in DFU mode” in the devices dropdown. Select “Internal flash” from the Targets box. In the Upgrade or Verify Action area, click “choose”, then select the DFU file you created. Next, click “Upgrade”. 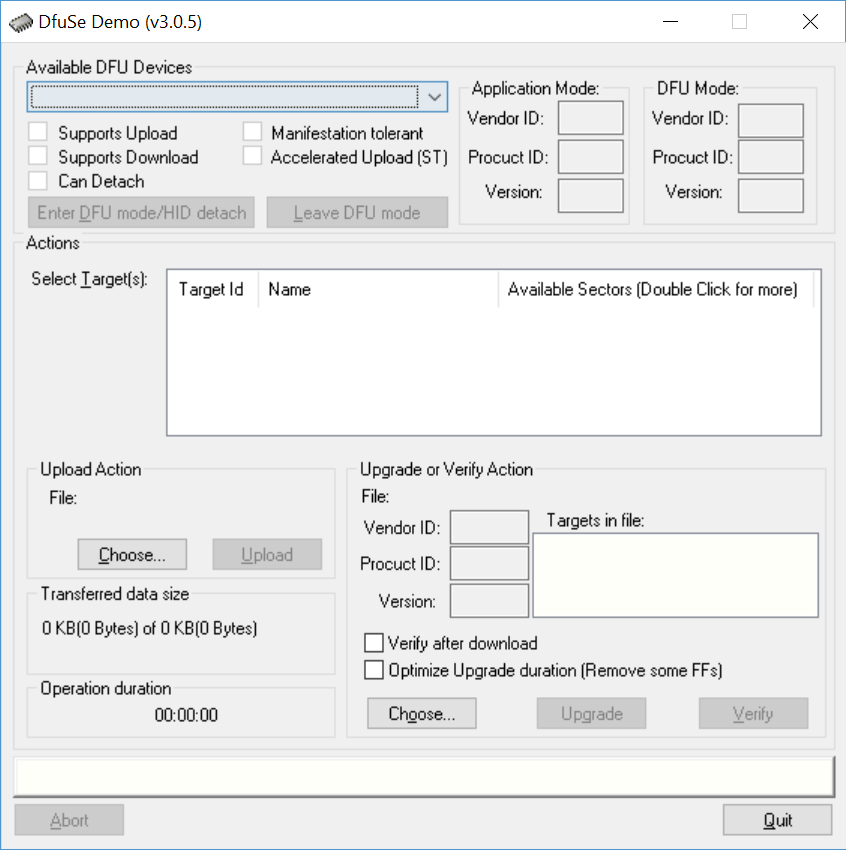 You will see a warning that because you’re in DFU mode the image cannot be validated for the target, or something similar. Accept this.
If you see “save” rather than “ok” in a file requester, you’ve selected the wrong choose: use the one in the Upgrade area rather than the Upload area!
Cross fingers and it should program fine.
Remove the Jumpers
Don’t forget to remove the programming jumpers you added…
Test!
Put in your host device and power up. If you’ve still got the 7 segment LED connected you will see F-F as an indication FlashFloppy is present.
Worked first time for me…
Troubleshooting
Programming failed, device not recognised by Windows, not appearing as DFU device in DFuseDemo…
Issue – From Keir: The bootloader can get confused at power on and detect the wrong baud rate, so this is a way to reset it without reconnecting power and USB and upsetting the rest of the connection..,
Solution – reset the drive by touching the reset pin to ground: with the power applied (via USB is fine) briefly connect pins I’ve labelled 5 and 6 in the diagram above. These are the two pins on the right of the left hand block of pins, when looking from the top/back of the Gotek.
Thanks to Kier, Damien and Owen on Facebook for this!
Device not recognised on USB3 / Hub / …
Issue – from Squirrel in comments below: USB cable and hubs can cause issues with device recognition, perhaps due to power connection in USB cable.
Solution: Add power connection in USB cable, as some OTG cables do not have this. Problem solved. Thanks to Squirrel for this one!

Thanks for the excellent description. I was able to successfully repeat the procedure on my Gotek, which had been flashed previously with Cortex firmware (ie. flashed the hard way, using the serial connection and USB converter).
I cannot however say that it worked like a charm. It seems the drive is sensitive to its power supply. I’ll explain how I coped with that.
When looking for a flashing cable, I was ready to do the same as you, slaughter two “excess stock” (don’t we hobbyists all have that?) cables and solder them together. But then I remembered a USB OTG drive that I bought many years ago, which was using a USB A to A cable, just like the one needed here. I measured the cable to make sure all conductors where connected 1-to-1 before plugging it in. However, the only reaction I got was “unknown device” (error code 10), even after installing the ST drivers from the program folder. I then decided to force install the DFU driver, which resulted in a recognized drive, which however couldn’t be started and thus still was not recognized by the DFuse program.
The next thought I had was that maybe the DFU mode didn’t work properly over USB3.0 (my computer only has 3.0 ports), so I put a USB2.0 hub in between. Now the error changed to a message saying that the drive’s firmware wasn’t providing the necessary resources (error code 29).
It was only then that I got the idea to use the 3rd connector on my cable. Since the cable belongs to a USB OTG drive, it had a 2nd USB connector on the computer side, which is only used to provide extra power to the drive (the data lines aren’t connected). So I put in the “power” connector, connected the drive and only then also connected the “data” connector. And hey presto! My drive was recognized, although still not as a DFU device. But now the Windows “searching for driver” popped up, enabling me to point at the program folder and install the correct driver.
After that, flashing the firmware was a breeze.
I hope my comments will help other people when they run into problems following this flashing guide.
Two additional remarks:
– On my final attempt, I didn’t use the hub but connected straight to my USB3.0 port. The reason I had doubts is that in the past, I had similar problems flashing other devices, which could be solved by using the hub to force USB2.0 mode.
– The cable I used is very similar (but not equal, because USB2.0) to this one: http://www.ebay.nl/itm/60cm-super-speed-Y-Splitter-USB-3-0-A-Male-to-USB-2-0-3-0-Male-Power-Data-cable/232018713767
Thanks for that! Very useful and as you say hopefully will help others.